Using Mail Merge Word with Excel data is a practical and smart way of working. Mail Merge allows you to automatically fill documents with specific data from Excel. This not only saves time but also ensures accuracy and consistency across documents.
Mail Merge is a feature in Microsoft Word which allows you to generate multiple copies of a document with unique information for each recipient. No need for copy-paste or boring manual adjustments.
Suppose you want to make an invitation letter, certificate or pay slip. The letter is written in the same format for many recipients. If without using Mail Merge, You'll probably copy the formatting to the next few pages, and of course this method is less effective and inefficient.
This guide will show you the steps to create a Mail Merge Word using data from Excel. You can practice this guide on Office 2013 or a newer version. For Office users 2010, There are special tricks to overcome problems that may occur.
List of contents:
Preparation
You need to create two documents to create Mail Merge Word with Excel data. Required documents:
- Form created using Word. Example: Income Certificate
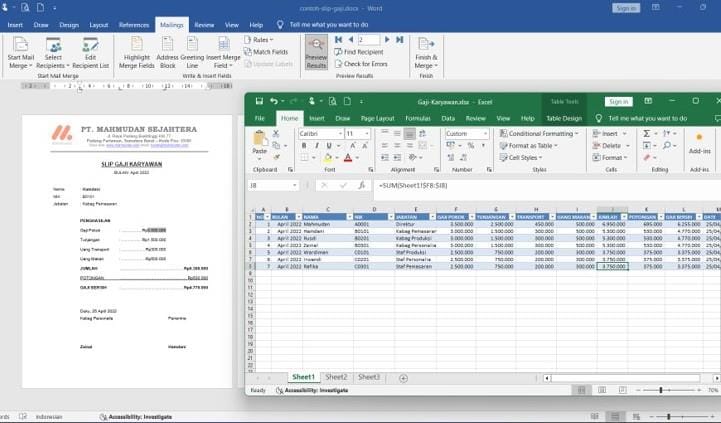
- The table has been filled with some example data using Excel as the data source. Learn how to create a table in Excel. Notes: The table used must be on the top row in the Sheet. Look example of Mail Merge Word file with Excel data
Mail Merge Word Steps with Excel Data
1. Connecting Mail Merge Word with Excel Data
The first step that must be taken is to connect Mail Merge to the data source, namely an Excel document. To connect mail merge with excel, follow the steps below
1.1. Select Excel Document
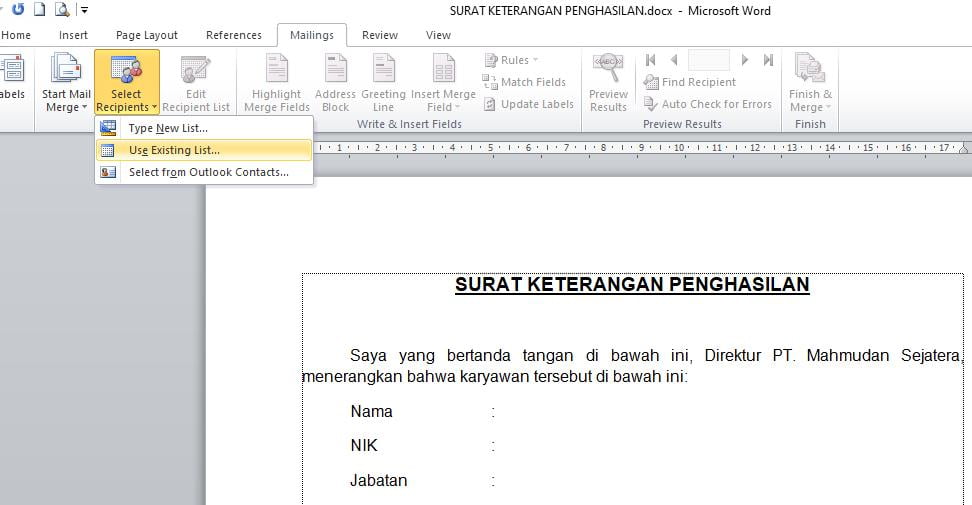
- Open the Word document you have prepared, then click tab Mailings, then click Select Recipients then select Use Existing List. Window File Explorer Select Data Source will open
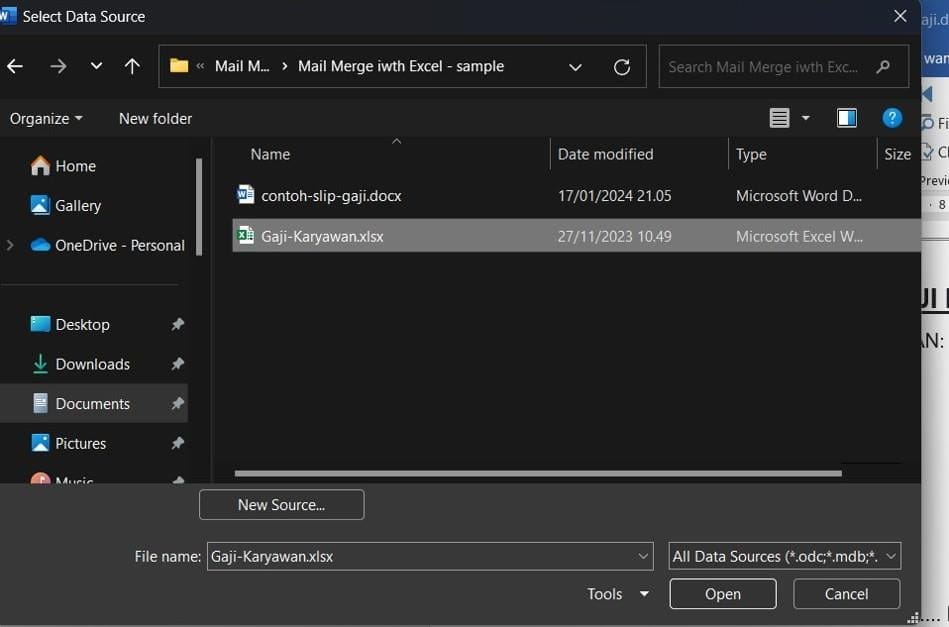
- On the window File Explorer Select Data Source, select the Excel document you created previously, examples in this guide are Employee Salaries.xlsx
1.2. Select the Sheet containing the Table
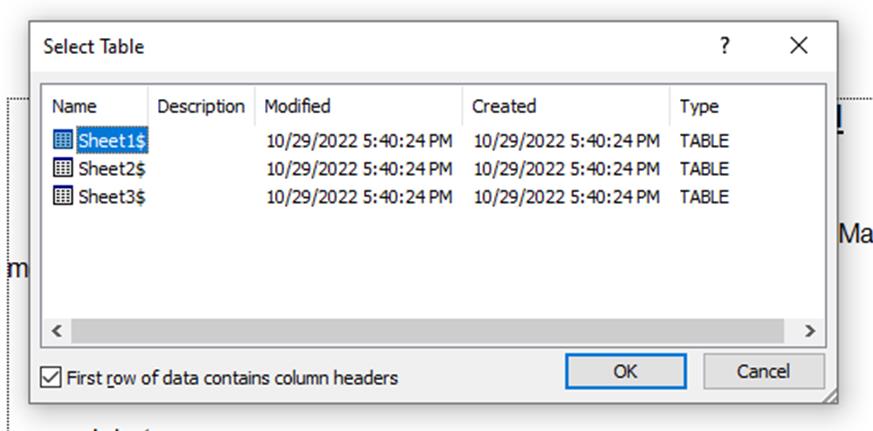
After selecting the Excel document, a dialog box will appear Select Table, select Sheet which contains the table you created, then click OK
2. Inserting Mail Merge Fields into a Word Document
Once you select the Excel document, now you can insert the Mail Merge field into the Word document. This field acts as a placeholder for the data that will be populated from the Excel table you created.
- On the tab Mailings, part Write & Insert Fields -> Insert Merge Field, You can see the fields according to the column headings in the Excel table.
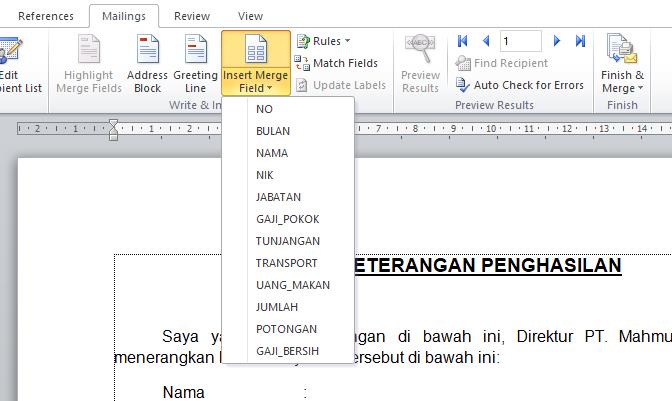
- Insert each field into its respective position in the Word document. Click the row or paragraph for the field and then select the appropriate field, field NO in paragraph No and so on.
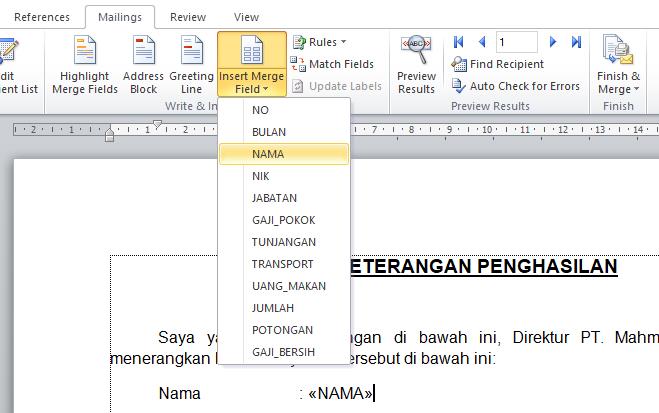
- Once you have completed all the fields, insert them into their respective positions, the results will look like below:

3. Displaying Mail Merge Results Data in Word Documents
3.1. Preview Results
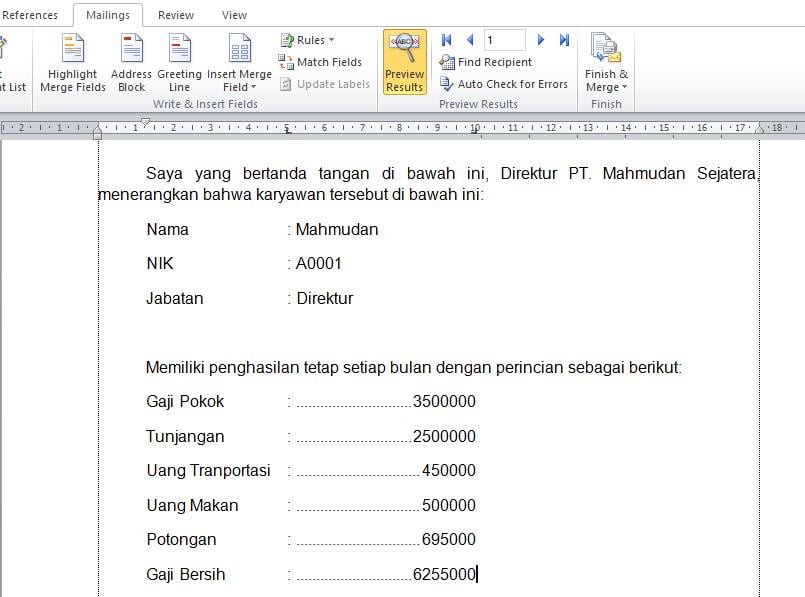
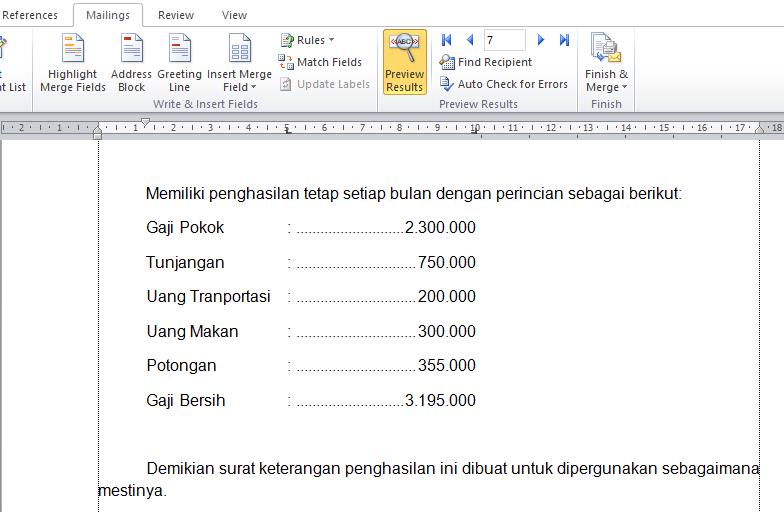
To display a preview of the Mail Merge results data, on the tab Mailings click Preview Results. You can see that the first data that appears is the first row of data in the Excel table.
3.2. Navigate Next and Previous Data
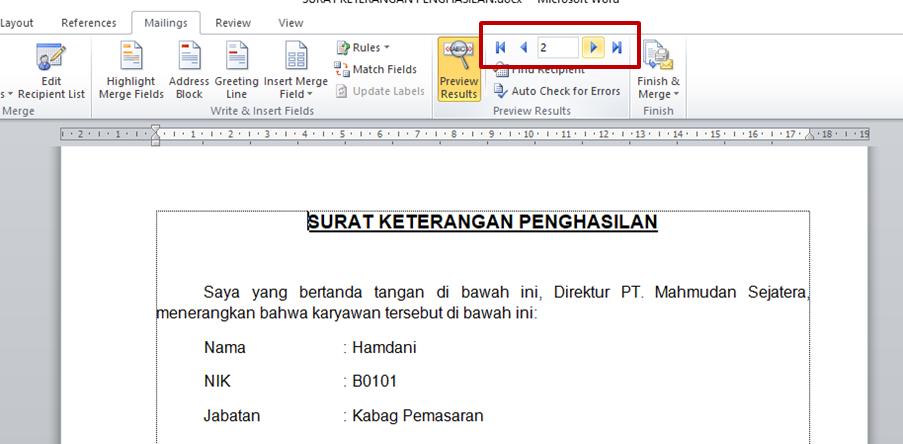
To move to the next or previous data, You can use the button Navigation (Red box). You can also jump to a specific row number by typing the sequence number according to the order of the data in the Excel table.
3.3. Searching for Specific Data Rows
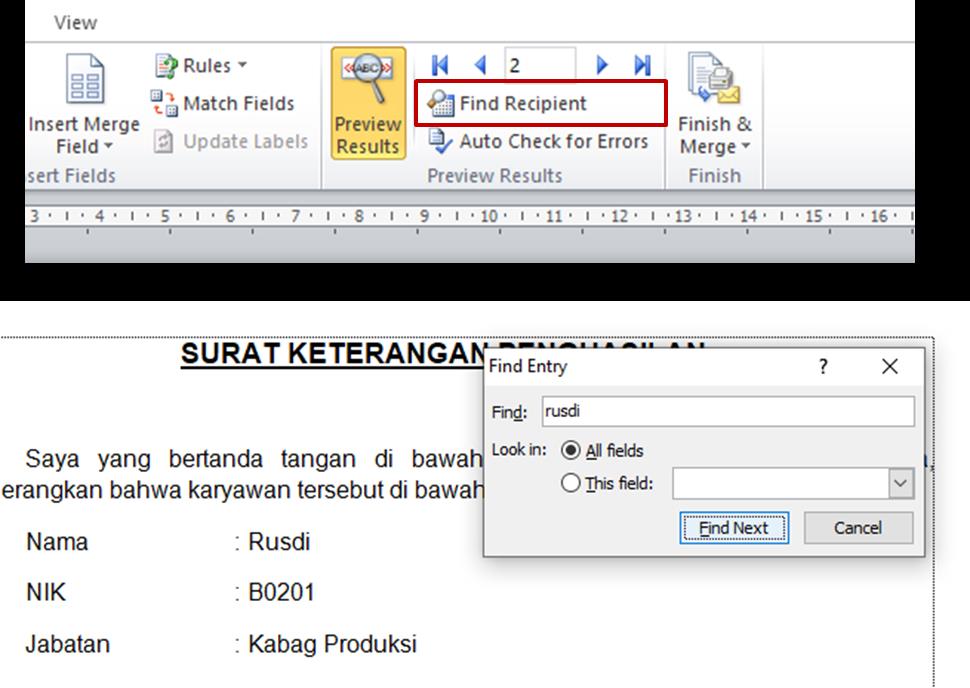
You can also search for specific data by pressing a button Find Recipient then type in the keywords you want to find.
4. Print Mail Merge Documents in Word
You can print Mail Merge documents in Word in two ways. The first in the usual way through a shortcut Ctrl+P, This method can be used if you only want to print mail merge data one by one.
The second way, print via the print feature of Mail Merge. This method is more efficient if you want to mass print several data at once.
To print from Mail Merge, on the tab Mailings click Finish & Merge, then select Print Document. In the dialog box Merge to Printer, You can select the row number of data you want to print, All, Current Record or a specific row range.
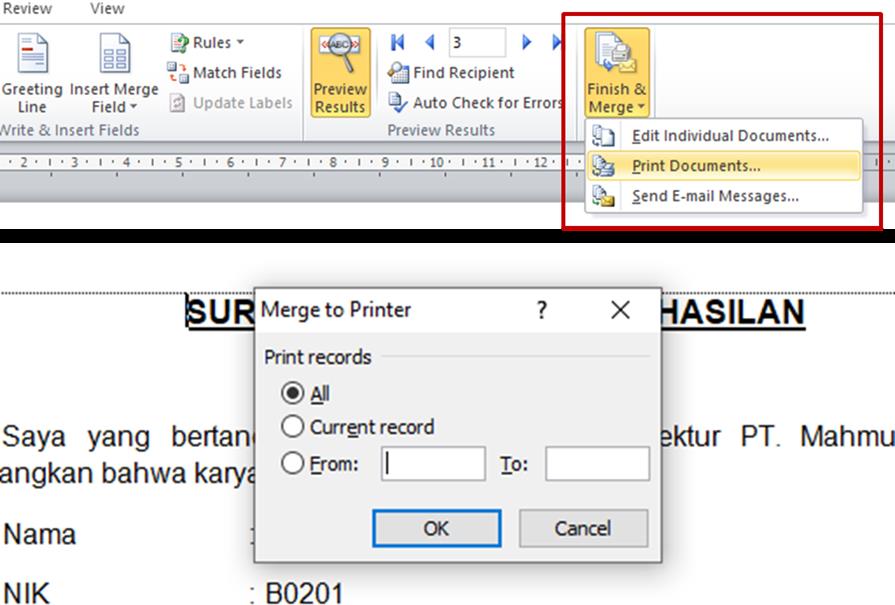
Until here, the steps to create Mail Merge Word with Excel data have been completed.
Troubleshoot Common Mail Merge Problems
Although Mail Merge is a powerful tool for creating personalized communications, sometimes this can create challenges that require troubleshooting.
One of the common problems that may occur when creating a Mail Merge is incorrect data population, i.e. information from your Excel data is not correctly filled into your document. This is often caused by format differences or inconsistencies in data sources.
You need to make sure that you have selected the correct Sheet. Also check the table you created, is there any empty space above the table?
Another common challenge in Mail Merge is format differences, where the appearance of the resulting Mail Merge document may be different from the design you want. This can be resolved by reviewing the formatting settings in the Mail Merge field and making adjustments.
Formatting Mail Merge Field Data
You may need to format the mail merge field so that the data appears as expected. Mail Merge field formatting is usually done for some special data such as numbers and dates.
As an example, The salary data displayed is Rp1000000, should be Rp1.000.000, and the date data displayed is 01/01/2022, it would be better to use the full format ie 1 December 2022.
To format Mail Merge fields in Word, follow the steps below:
- Right-click the field for which you want to change the format, then click Toggle Field Code
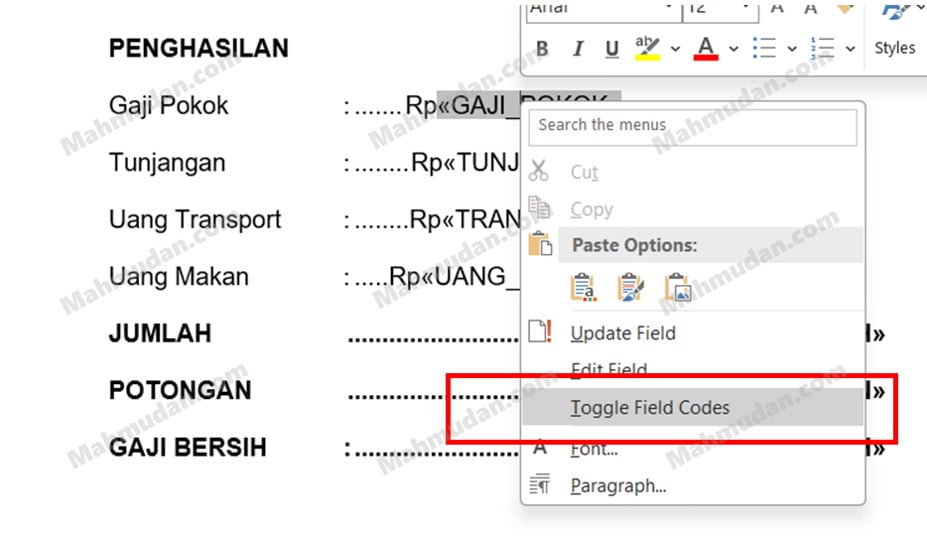
- To format numbers with thousands separators, add code\# #.##0 after the field name, as follows:
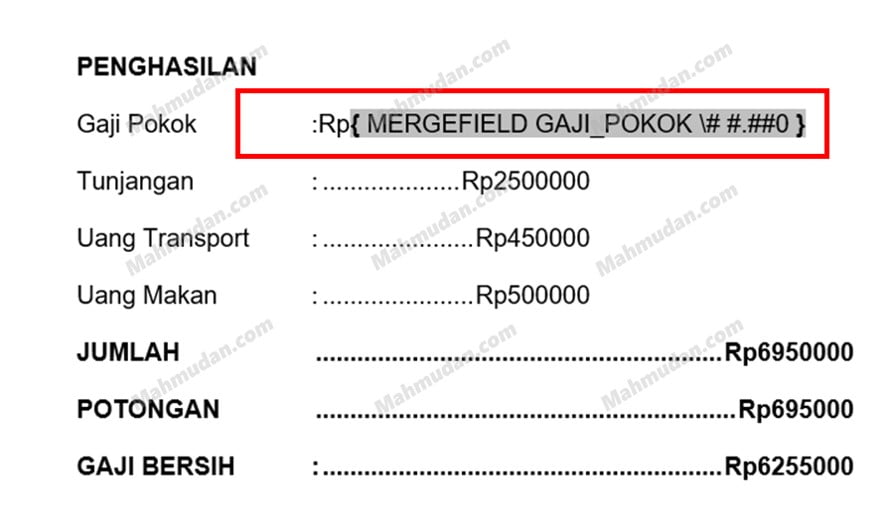
Repeat steps one and two above for each data that uses the same format.
- To format Indonesian dates, for example 12 April 2022, add \@”dd MMMM yyyy” after the field name, as follows:

After formatting all the required fields, the results will look like below:
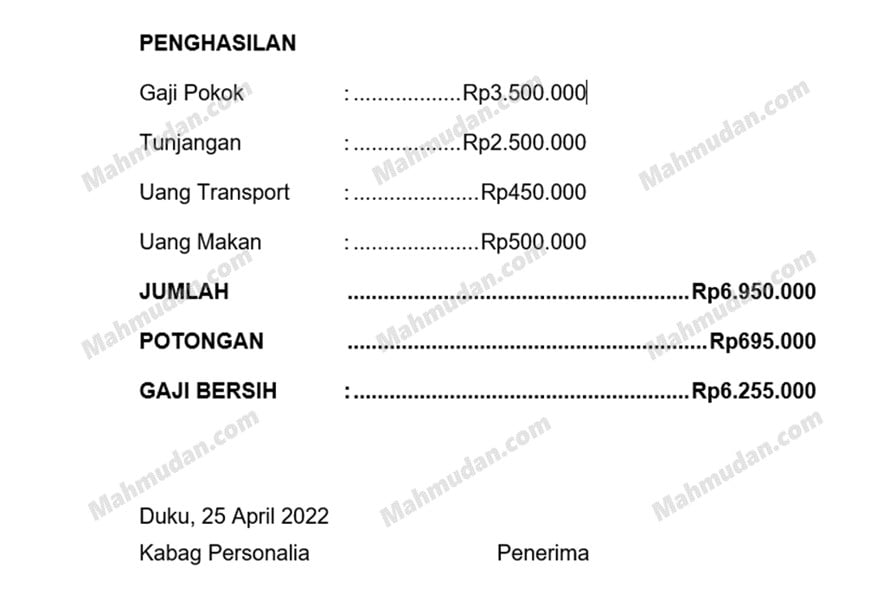
Finished, Now all Mail Merge data appears in the proper format.
If you still experience failure in creating Mail Merge with Excel data, for example, the data that appears does not match the expected format, maybe it happens because you are using an older version of Microsoft Word. To solve this problem, There is a special trick so that Word displays Mail Merge data in the format it should be.
Special Mail Merge Tricks
This special Mail Merge Word trick with Excel data is only suitable for Microsoft Word 2010 or older versions. With this trick, Mail Merge will display data according to the format applied in the Excel document without the need to change the format of the mail merge field in the Word document.
Follow the troubleshooting steps below:
- Open Word Option which is in the tab File then select Options
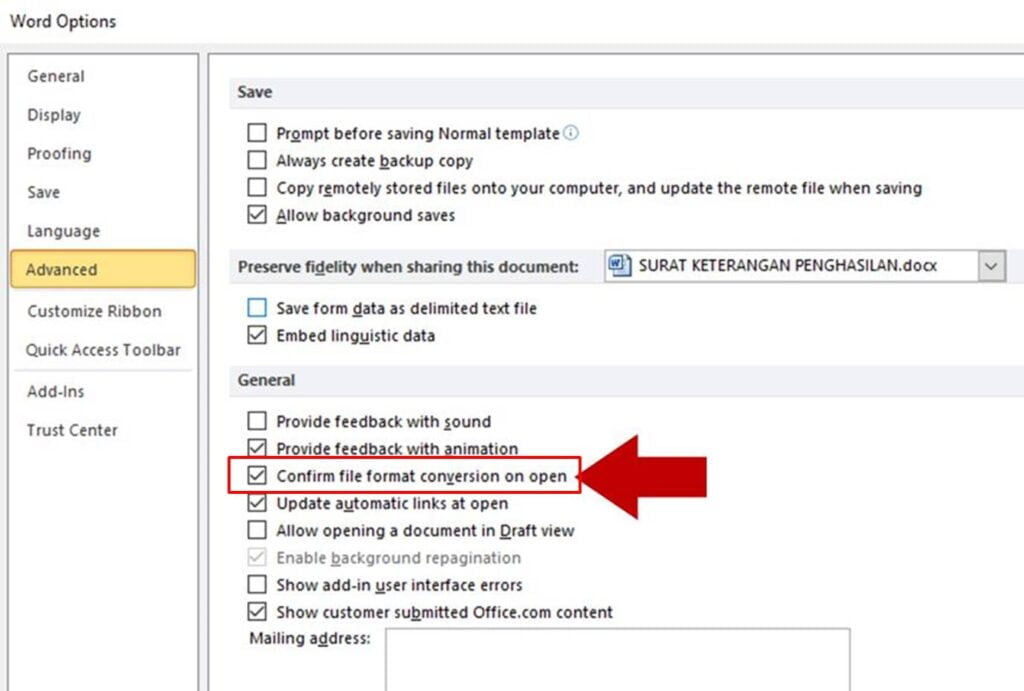
- At the window Word Options, click the menu Advanced then select (tick) option Confirm file format conversion on open
- Click OK, then save and close the Word document.
- Reopen the document Word that you have made Mail Merge previously.
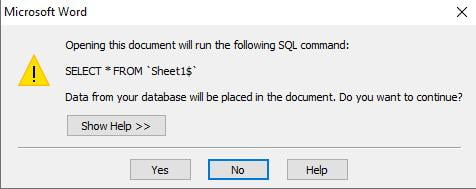
- When opening the document, A confirmation dialog box will appear as shown below, then click Yes
- Once the document is open, repeat connecting Mail Merge Word with Excel data. This step aims to activate a new connection to select the data source and connection type.
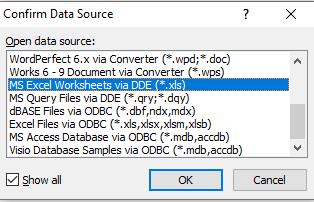
- When you select a document Excel, a dialog box will appear Confirm Data Source. In this section, You have to show all data source, then check the option Show All. After all data sources appear, select MS Excel Worksheets via DDE (*.xls) then click OK.
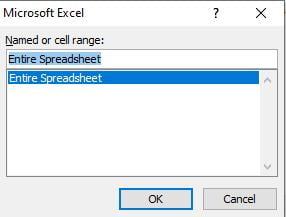
- The system automatically opens the Excel document you have previously selected. When the confirmation dialog box appears, click OK
- If this trick is successful, you can run it, then the Word document will display the Mail Merge data according to the format used in the Excel document.
Closing
That's the guide to making Mail Merge Word with Excel data, Hopefully this guide can be useful and make your work easier.
Please download example of Mail Merge Word file with Excel data which has been provided free of charge.
By understanding the concept of Mail Merge Word with Excel data from the example that has been provided, You can create Mail Merge Word on a larger scale, revolutionize the way you handle the document creation process.
If you prefer to follow tutorials with videos, You can watch a video on how to create a Mail Merge with Excel data.

Thank you young man, really helped us